ATO Configuration Cycle In Order Management (Doc ID
844847.1)
In this Document
Purpose
Scope
Details
Setup Steps
Create items
Assign a sales price to the newly created items
Create stock for the purchased items (options) for a
sufficient test quantity
Create Bill Of Materials (BOMs)
Testflow steps
Sales Order creation
Configure the ATO model
Generate the Configured Item
Generate the WIP discrete job
Progress the WIP job
Complete the WIP job
Pick release the configured item line
Ship confirm the configured item line
Close the configured item line and invoicing process
References
APPLIES TO:
Oracle
Order Management - Version 11.5.8 to 12.1.1 [Release 11.5.8 to 12.1]
Information
in this document applies to any platform.
***
Checked for relevance 19-May-2013 ***
PURPOSE
This
document is intended to help users successfully setup organizations for the
purpose of Intercompany Invoicing through the Oracle Inventory Application.
The
purpose of this bulletin is to provide Oracle Customers with a good
understanding and the to build a test case for basic ATO Configurations
SCOPE
This
document helps the Support Engineers and Oracle Customers to understand the
setup steps with the relevant setup needed to create simple test case for ATO
Configurations.
Screen
shots of setups and test case in this note were done in an R11.5.10 instance on
an Oracle Internal Test Instance.
DETAILS
Setup Steps
Login
User
: OPERATIONS / WELCOME
Responsibility : Manufacturing and Distribution Manager
Create items
1.
To setup an ATO Model a few items are needed to get a BOM minimum skeleton.
Through this example, an ATO item (parent), an option class and 3 components
(purchased items) are needed.
=>
Navigate to Inventory -> Items -> Master Items
Select
organization :
V1 (Vision Operations)
=>Enter
Item Name and Description (with XX=your initials) :
Model item name : XX AtoModel M01
Description : XX AtoModel M01
=>
Go to Tools -> Copy From :
Apply the 'ATO Model' template
In
the Order Management tab, check that the Assemble to Order flag (ATO) is
checked.
In
the General Planning tab, check the Make or Buy flag to Make.
=>
Save the record, and assign the item to Organization M1.
2.
Similarly create Option Class item 'XX OCModel M01' using the 'ATO Option
Class' template, and the three purchased items like 'XX PurchItem1 M01' using
the Purchased item template. Assign them all to M1.
The
Option Class item has a WIP Supply Type as 'Phantom'.
Assign a sales price to the newly created items
Navigate
to Pricing -> Price List-> Price List Setup. Confirm it is active.
Create
a specific Price List (or query up 'Corporate' to add them to it) and go to the
List Lines zone.
Click
on the New button in the tool bar, enter the following information for each of
the created items, then click on Save
Product Context: Item
Product Attribute: Item Number
Product Value: XX AtoModel M01
Value: 15.5 (or any other value)
Leave other fields with default values
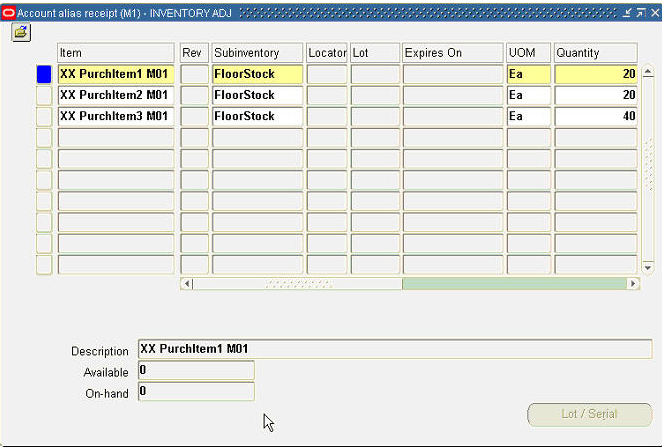
Create stock for the purchased items (options) for a
sufficient test quantity
Navigate
to Inventory -> Transactions -> Miscellenaous Transactions
Select
organization : M1 (Seattle manufacturing)
Type : Account Alias Receipt (select whatever source)
Subinventory : FloorStock (for ex.)
Create Bill Of Materials (BOMs)
The
BOM to be built for the test case will be as simple as the following (Indented
BOM - final result) :
Using
a BOM Responsibility, you can either create the BOM in V1 Org. then copy it to
M1, or to create it in M1 Org. and make it a Common BOM.
The
BOM has to exist in both the OU (Validation Org.) and the Shipping Org.
Model
Routing has to be created first
Model
BOM to be then created, preferably starting for the lower level
=>
Navigate to BOM -> Routings -> Define
Enter the newly created ATO Model item name
Add operations 10 & 20 using (predefined) Standard Operations
Save
=>
Using a BOM Responsibility, navigate to BOM -> Bill Of Materials ->
Define
Enter the newly created Option Class item name
Add the components of the Option Class, here Purchased items 2 and 3 are
optional
Save
Then enter the Model item name
Add the option class and the Purchased item 1 (as mandatory items)
Set the purchased item 1 having a mandatory quantity of 2
Save
=>
Notice that the Option Class keeps a Supply Type as Phantom.
Testflow steps
The
flow describes the steps from the ATO Sales Order creation to its closure. Make
sure that the testing user has sufficient Shipping Role/Grants to process all
the WSH steps in Org. M1
Sales Order creation
Change
of Responsability to : Order Management Super User, Vision Operations (USA)
Navigate
to Orders,Returns -> Sales Order (or Order organizer) -> enter new S/O
Select M1 as the Warehouse (Others tab)
Go
to the Lines tab and enter your model item
Item : XX AtoModel M01
Enter the line quantity
Configure the ATO model
Click
on the Configurator button to open the CZ selector and to select the model
options
Notice
that
-
the item 'XX OCModel M01' has a red star in the model tree : this to indicate
that a component (at least) of the option class is mandatory
-
the Purchased item 1 does not appear as being mandatory and not an option
Select
the desired components
Click
on the 'done' button when finished, i.e. when the configuration is complete
=>
The cursor is back to the sales order entry form and the order can be booked as
the configuration is complete :
Generate the Configured Item
=>
The ATO model line workflow has now progressed to the 'Create configuration
eligible' activity.
From
the ATO model line, the configured (ATO item or 'star' item) is ready to be
created :
Select
Actions -> Progress Order
Click OK
=>
This creates the configured item on line 1.1..0 :
This
line WF is at 'Create Supply Order Eligible' activity :
Generate the WIP discrete job
From
the configured item line, the WIP discrete job is ready to be created :
Select
Actions -> Progress Order
Click
OK
=>
This launches a Concurrent Request process :
=>
The result of the request is seen in View requests : AutoCreate Final Assembly
Orders.
The
output shows the WIP Discrete Job Order number for the ATO item : 98704
=>
Place the cursor on the configured item line in S/O entry form, and you’ll
check that the Reserved Quantity = 2.
=>
The Job name can be checked from the S/O entry form by using the menu options :
.
Tools -> Scheduling -> Reservations Details
.
The WIP job order inherits the sales order quantity of the configured item.
Progress the WIP job
It
is necessary to progress the WIP discrete job up to completion in order to
fulfill the reserved sales order demand of the configured item line. Then the
configured item will have some stock to be pick released and shipped against
the sales order.
=>
Change to a Manufacturing/WIP responsibility to check the job number created in
unreleased status in Org. M1.
.
Navigate : WIP -> Discrete Jobs -> Discrete
.
Query the job number (or the configured item as the Assembly) : 98704
=>
Change its status to Released and save :
The
link with the Sales Order line is shown when clicking on the Sales Orders
button :
=>
The discrete job order is now ready to be progressed until final completion. To
do this, it's required to move the start quantity from the first routing
operation (Step Queue of Operation 10) to the last one (at To Move step of
Operation 20) :
Navigate
: WIP -> Move Transactions -> Move Transactions
.
Query the job name (or the Assembly)
.
Set the transacted quantity
.
Select the From/To in the Operations zone
.
Save the move transaction
Complete the WIP job
=>
As the full WIP job quantity has been transferred to the last step of the last
operation, it can be completed. This will create the stock of the configured
item, reserved for the particular S/O line.
.
To directly set the WIP job as completed, navigate to : WIP > Material
transactions > Completion Transactions.
.
Query the job number
.
Select the subinventory where the stock is placed
.
Set the completed quantity
.
Click the 'Done' button
=>
The WIP job order has now a 'complete' status and shows the completed quantity
:
Pick release the configured item line
Responsibility
: Order Management Super User, Vision Operations (USA)
=>
At this stage, the sales order line of the Configured item is at awaiting
shipping status :
=>
The Line is ready to be pick released.
Navigate
: Order Management -> Shipping -> Transactions
.
In the Lines/LPN tab, verify that the line status is Ready to Release
.
Select the Launch Pick Release option from the Actions menu
.
click on the Go button
.
This launches the pick release concurrent request for the delivery.
=>
The delivery is now ready to be ship confirmed.
Ship confirm the configured item line
Navigate
: Order Management -> Shipping -> Transactions
.
(Re)Query the Sales Order
.
In the Lines/LPN tab, verify that the status is Staged/Pick Released
.
Confirm the Shipped quantity = Picked quantity
.
Select the Delivery tab
.
Select the Ship Confirm option from the Actions menu
.
click on the Go button
.
Keep the Ship Entered Quantities radio button checked on the Ship Confirm form
.
Check the feedback message (ITS run)
.
When ITS has ran fine, the cursor is back to the delivery tab of the Shipping
Transactions form. The delivery is now at Closed status.
Close the configured item line and invoicing process
=>
When ITS has ran fine, the configured item line has Shipped status. The
delivery status can be retrieved from the sales order line through the Actions
-> Additional line details option.
=>
The configured item line workflow is now in fulfill deferred activity.
=>
But only the ATO model line will be invoiced and will progress to invoicing
activity when the WF background has ran :
=>
The Sales Order 16567 lines (only components marked as optional in BOM can be
shown on invoice in addition to the ATO model) are now in the autoinvoice
interface table, ready to be processed by Receivables :
This
completes the steps for the ATO Configurations test flow
Refer
to the Oracle Order Management User Guide and the Oracle Configure To Order
Implementation Guide for documentation on ATO Configurations (referred to in
this page as the User and Implementation Guides)
Reference :- Order Management Testcase Repository Library (Doc ID 743389.1)


